# Create a C-based Adapter blade
Here we explain how to create an Adapter blade where the Integration Adapter part is written in C.
If you want to create an Integration Adapter using Java, see [Create a Java-based Adapter blade](cdf-create-a-java-based-adapter-blade.md).
## Before you start
The best way to describe the development process is to use an example Integration Adapter as a template. The Deployment Framework contains an Adapter blade called DemoDataSource, where the Integration Adapter part of the blade is written in C. The Adapter connects to a Transformer and feeds [record type data](../datasource/datasource-records.md) to the Liberator via the Transformer. We’ll use the DemoDataSource blade as a template to create a new Adapter blade called **MyAdapterBlade**.
You’ll need a Transformer and Liberator to help test your Adapter blade while you develop it. If you don’t have Transformer/Liberator already deployed on a machine for this purpose, you may wish to deploy one or both of these components to the Deployment Framework on your development machine. To do this, follow the instructions in How can I... [Deploy Platform components to the Framework](cdf-deploy-platform-components-to-the-framework.md). You won’t need to set up HTTPS connections or KeyMaster while you’re developing the blade, so you can ignore the topics about those things.
In this example. we’ve assumed that Liberator and Transformer are deployed on the server machine where you are going to develop the Adapter blade.
- 💡 TIP
-
In the following steps you’ll be using the `dfw` command of the Deployment Framework. Before entering any `dfw` command as `./dfw `, make sure your current (working) directory is set to the Deployment Framework’s topmost directory (defined as _<Framework-root>_ in the rest of this example)..
For a list of `dfw` commands, [click here](cdf-the-deployment-framework-command-utility-dfw.md).
### Blade structure
What’s in a C-based Adapter blade?
The blade is located within the Deployment Framework at _<Framework-root>/kits/<blade_name>/<blade_name>/_
In directories relative to this:
* The blade’s [field definitions](../datasource/datasource-field-definitions.md) are in _blade_config/fields.conf_
* The Integration Adapter’s [DataSource configuration](../datasource/datasource-datasource-configuration.md) is in _DataSource/etc/<adapter_binary_name>.conf_
* Liberator related configuration is in _Liberator/etc/rttpd.conf_
* Transformer related configuration is in _Transformer/etc/transformer.conf_
* Configuration, binary files, and startup scripts for the Integration Adapter itself, are in _DataSource/_
## Summary
In brief, you create the blade using the following steps, which are given in more detail further down the page:
1. [Create the Adapter blade’s directory structure](#create-the-adapter-blades-directory-structure)
2. [Create the field definitions in fields.conf](#create-the-field-definitions-in-fieldsconf)
3. [Clean up the DataSource files](#clean-up-the-datasource-files)
4. [Update the core component configuration](#update-the-core-component-configuration)
5. [Set up Liberator configuration](#set-up-liberator-configuration)
6. [Set up Transformer configuration](#set-up-transformer-configuration)
7. [Integrate the initial core component configuration with the Deployment Framework](#integrate-the-initial-core-component-configuration-with-the-deployment-framework)
8. [Set up DataSource configuration for the Integration Adapter](#set-up-datasource-configuration-for-the-integration-adapter)
9. [Develop the new C-based Integration Adapter](#develop-the-new-c-based-integration-adapter)
10. [Start the new Adapter blade](#start-the-new-adapter-blade)
11. [Package the new Adapter blade](#package-the-new-adapter-blade)
## Create the Adapter blade’s directory structure
1. In a directory that’s _outside_ the Deployment Framework (say _Temp_C_blade_), make a copy of the DemoDataSource blade’s directory structure - the directory _DemoDataSource_ within __<Framework-root>/kits/__and everything within it.
2. Rename the copy of the _DemoDataSource_ directory in _Temp_C_blade_ to your new blade name: _MyAdapterBlade_
## Create the field definitions in fields.conf
Edit the file _MyAdapterBlade/blade_config/fields.conf_ to remove the existing fields and add all the fields provided by MyAdapterBlade’s Integration Adapter.
The file has a warning comment at the top:
```
#
# DO NOT EDIT THIS FILE !!!
#
```
You can ignore this warning, because it only applies to the original file used by the DemoDataSource blade. You’ve taken a copy for use with the new blade, and during the development of the blade you obviously need to change the file!
Here’s an example of some _fields.conf_ entries for a C-based Adapter blade.
```
add-field ExampleAdapterField1 -99000 0
add-field ExampleAdapterField2 -99001 0
```
In this example, the field numbers are negative because they’ve been defined by Caplin Systems. The zero at the end of each line is a `FieldFlags` parameter that indicates the field is a "normal" [type 1 data](../datasource/datasource-type-1-data.md) (that is, it’s not a [type 2 data](../datasource/datasource-type-2-data.md) secondary key (index) or [type 3 data](../datasource/datasource-type-3-data.md), and it has no restriction on the number of decimal places)
You should define your fields with positive field numbers, to distinguish them from Caplin-defined fields. Make sure the field numbers are unique across your Caplin Platform installation. For "normal" fields you can omit the `FieldFlags` parameter, because its default value is zero. For example, you might define:
```
add-field Desc 10001
add-field Amt 10002
add-field Bid 10003
add-field Ask 10004
add-field PriceTime 10005
```
For more about field definitions, see [Field definitions concepts](../datasource/datasource-field-definitions.md) and [Field definition](../datasource/datasource-field-definition-format.md)[format](../datasource/datasource-field-definition-format.md).
## Clean up the DataSource files
1. In _Temp_C_blade/MyAdapterBlade/DataSource/etc/_, rename the file _demosrc_ to the name of the executable file for your new Integration Adapter; in this worked example, the new name is _myadapter_
Also, make sure the file has execute permission.
2. In _Temp_C_blade/MyAdapterBlade/DataSource/etc/_, rename the _demosrc_ part of the Adapter configuration file _demosrc.conf_ to the name of the executable file for your new Integration Adapter; in this worked example, the new name for the configuration is _myadapter.conf_
3. Remove the file _Temp_C_blade/MyAdapterBlade/DataSource/bin_ (On Linux this is a symbolic link, on Windows it’s a shortcut file)
4. Remove the file _Temp_C_blade/MyAdapterBlade/DataSource/lib_ (On Linux this is a symbolic link, on Windows it’s a shortcut file)
5. In the directory _Temp_C_blade/MyAdapterBlade/DataSource/_, create a directory called _bin_
6. In the directory _Temp_C_blade/MyAdapterBlade/DataSource/_, create a directory called _lib_
7. Delete any files that are in _Temp_C_blade/MyAdapterBlade/DataSource/var_
**📌 NOTE**\
Initially the _var_ directory of the new blade must contain no files, but the directory must exist and it must become part of the blade kit. This directory is used by the Integration Adapter at run time, to store log files for example.
## Update the core component configuration
Your new Adapter blade has configuration files for the core components (Liberator or/and Transformer) that it interacts with. This configuration consists of:
* [Data services](../datasource/datasource-data-services.md) for the data provided by the blade.
* An `add-peer` configuration entry if the Integration Adapter connects to the core component.
* Failover configuration if the Integration Adapter can be located in a failover leg***__.__*** (There’s more about this in How Can I... [Set up server failover capability](cdf-set-up-server-failover-capability.md), but for the rest of the example here, we won’t worry about failover.)
Which core components require configuration depends on how your Integration Adapter is going to interact with the rest of the Caplin Platform. Typical situations are:
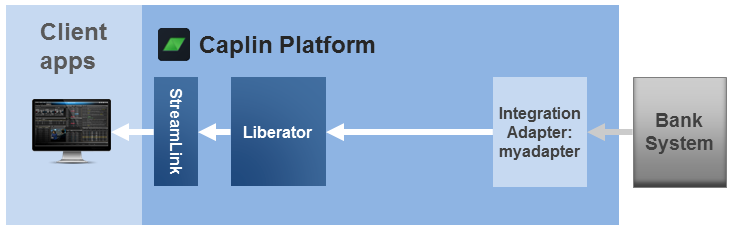
* The Integration Adapter connects directly to a Liberator and doesn’t send data to or require any services from a Transformer.
In this case, you only need to define Liberator configuration – configuration of the connections to the Adapter, and usually one or more data services that are served by the Adapter:
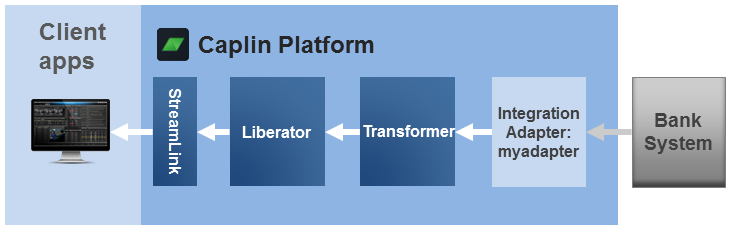
* The Integration Adapter connects to a Transformer and sends data to it, the Transformer then forwards the (usually modified) data on to a Liberator.
In this case, you need to define both Transformer and Liberator configuration for the blade. The Transformer configuration defines connections to the Adapter, and usually one or more data services that are served by the Adapter. The Liberator configuration typically defines one or more data services (that are served by the Transformer), but no Adapter connections.
Here we’re going to go through an example of this second situation:
For simplicity, we’ll assume that you only want one instance of the blade’s Integration Adapter to run in your development environment; that is, you’re not going to require load-balancing across multiple instances of the Adapter, or failover to alternate Adapter instances. Once you’ve developed your Adapter blade to your satisfaction, you can configure it for failover and/or load balancing; for how to do this, see How Can I... [Set up server failover capability](cdf-set-up-server-failover-capability.md).
### Set up Liberator configuration
You set up the Liberator configuration to connect to the Transformer, and then you define a data service that will supply the updates (via the Transformer) from the Integration Adapter you’re going to develop:
1. Search the file _Temp_C_blade/MyAdapterBlade/Liberator/etc/rttpd.conf_ for the string `DemoDataSource` and replace all occurrences with the string `transformer`.
The file has a warning comment at the top:
```
#
# DO NOT EDIT THIS FILE !!!
#
#
# If you need to change any configuration, do so by updating
#
# global_config/environment.conf
# global_config/overrides/servers/Liberator/etc/rttpd.conf
# ...
```
You can ignore this warning, because it only applies to the original file used by the DemoDataSource blade. You’ve taken a copy for use with the new blade, and during the development of the blade you obviously need to change the file!
2. Delete the configuration that handles the incoming connection from the DemoDataSource. The Liberator won’t be connecting directly to myadapter, so you don’t need to define any connection configuration for it. So delete the configuration that’s shown in _italics_ below:
```
# Incoming connection from Demosrc
add-peer
remote-id ${THIS_LEG}03
remote-label transformer${THIS_LEG}
heartbeat-time 15
heartbeat-slack-time 5
end-peer
if "${FAILOVER}" == "ENABLED"
add-peer
remote-id ${OTHER_LEG}03
remote-label transformer${OTHER_LEG}
heartbeat-time 15
heartbeat-slack-time 5
end-peer
endif
add-data-service
service-name transformer${THIS_LEG}
include-pattern ^/EXAMPLES/
add-source-group
...
```
3. Update the `include-pattern` of the data service to the correct name for the data that your Adapter will supply.
For example, the `include-pattern` in the file as edited so far looks like this:
```
add-data-service
service-name transformer${THIS_LEG}
include-pattern ^/EXAMPLES/
...
```
Assume that your new adapter is connected to an FX price feed, where the subjects of the FX instruments start with /FX/. Then you would change the `include-pattern` to:
```
add-data-service
service-name transformer${THIS_LEG}
include-pattern ^/FX/
...
```
4. Change the name of the data service (`service-name`) from `transformer` to a more meaningful name, such as `FXPriceFeed`:
```
add-data-service
service-name FXPriceFeed${THIS_LEG}
include-pattern ^/FX/
...
```
**💡 TIP**\
The data service name needs to be unique. If you accidentally pick a new name that’s in another blade, the Liberator won’t start, and it’ll tell you why.
5. At this point, you may be wondering how, given that you deleted the connection configuration in step 2, the data service (and peer failover if it were enabled) can be associated with the Transformer.
The answer is, that there’s a base-level configuration file for Liberator, located in _<Framework-root>/servers/Liberator/etc/rttpd.conf_ that defines, in conjunction with the `datasrc-id` definitions in _<Framework-root>/global-config/environment-defaults.conf_, the Liberator’s connection to the Transformer. The base-level configuration refers to the Transformer connection through the label `transformer`, and this same label has been used to refer to the Transformer in the Liberator configuration for the new blade. When you deploy the new blade, the Deployment Framework merges the Liberator configuration for the blade with the base-level configuration, ensuring that the `FXPriceFeed` data service is correctly associated with the Transformer.
### Set up Transformer configuration
You set up the Transformer configuration to connect to the new blade’s Integration Adapter, and then define a data service that will supply the updates from the Integration Adapter:
1. Search the file _Temp_C_blade/MyAdapterBlade/Transformer/etc/transformer.conf_ for the string `DemoDataSource` and replace all occurrences with the string `MyAdapterBlade`.
Once again, you can ignore the "DO NOT EDIT THIS FILE !!!" warning at the top of the file.
2. Change any comments about Demosrc or DemoDataSource to refer to MyAdapterBlade instead (for example, you would change "Incoming connection from Demosrc" to ``Incoming connection from MyAdapterBlade``
).
3. Update the `include-pattern` of the data service to the correct name for the data that your Adapter will supply.
For example, the `include-pattern` taken from DemoDataSource typically looks like this:
```
add-data-service
service-name New AdapterBlade${THIS_LEG}
include-pattern ^/EXAMPLES/
...
```
And, as for the Liberator configuration, it must be changed to specify subjects that start with (in our example) `/FX/`:
```
add-data-service
service-name New AdapterBlade${THIS_LEG}
include-pattern ^/FX/
...
```
4. Change the name of the data service (as you did in the Liberator configuration):
```
add-data-service
service-name FXPriceFeed${THIS_LEG}
include-pattern ^/FX/
...
```
5. Change each occurrence of the `remote-id` number from `03` (the `datasc-id` of the DemoDataSource) to `04` (the `datasc-id` that we’re going to use for the new Integration Adapter):
```
# Incoming connection from MyAdapterBlade
add-peer
remote-id ${THIS_LEG}04
...
if "${FAILOVER}" == "ENABLED"
add-peer
remote-id ${OTHER_LEG}04
...
```
This ensures that the Transformer can distinguish the new Integration Adapter from the DemoDataSource.
### Integrate the initial core component configuration with the Deployment Framework
Now you’ve created the initial configuration for the core components that use your Adapter blade, you can use this configuration to allow a Transformer and/or Liberator in your development environment to accept peer connections from the Integration Adapter you’re developing.
1. ZIP up the blade directory structure in your temporary work area into a skeleton blade kit, The _.zip_ file must have a name of the form _<blade_name>-<version_number>. .zip_
The topmost directory in the _.zip_ file must be the top level directory of the blade.
So in our example:
The _.zip_ filename is _MyAdapterBlade-<version_number>.zip_ (say _MyAdapterBlade-000001.zip_),
The topmost directory in the _.zip_ file is _MyAdapterBlade_.
2. Navigate to _<Framework-root>_ and deploy the skeleton blade kit:
```
./dfw deploy ../Temp_C_blade/MyAdapterBlade-000001.zip
```
The `./dfw deploy` command should respond with:
```
Boot-strapping the Deployment Framework
Unpacking MyAdapterBlade kit MyAdapterBlade-000001.zip
MyAdapterBlade-000001.zip successfully unpacked and stored in kits/archive
Activating MyAdapterBlade
Blades ok
Adapter blades deployed. Configure the hosts for the following blades using the ./dfw hosts command.
- MyAdapterBlade
```
And then `./dfw versions` should show:
```
Deployment Framework 6.0.4-267113
Core components Version
-----------------------------------------------------------
Liberator 6.1.0-275608
Transformer 6.1.0-275716
Deployed blades Version State
-----------------------------------------------------------
MyAdapterBlade Active
Built-in blades State
-----------------------------------------------------------
BlotterExport Inactive
DemoDataSource Active
DirectConnection Active
HTTP Active
HTTPS Inactive
JavaOpenPermissioning Inactive
LiberatorJMX Inactive
LiberatorWebsite Active
MinimalLiberatorWebsite Inactive
OpenPermissioning Active
ServerIdentification Active
TransformerJMX Inactive
```
Note that deploying the skeleton MyAdapterBlade has automatically put it in the [active](cdf-active-and-inactive-blades.md) state.
3. You should deactivate the DemoDataSource blade, so it doesn’t interfere with the testing of your Adapter while you’re developing it:
```
./dfw deactivate DemoDataSource
```
4. Start the deployed core components and MyAdapterBlade blade:
```
./dfw start
```
At this stage the Liberator and Transformer are running with the new configuration. The new blade won’t run of course, because no executable code has been written for the Integration Adapter. Once you’ve developed the new Integration Adapter, when you run it in your development environment, the Transformer should accept peer connections and data from the Integration Adapter and pass the updates on to the Liberator.
**💡 TIP**\
At this stage, you don’t need to have populated any of the new blade’s _DataSource_ directory tree - that’s in the next steps...
### Set up DataSource configuration for the Integration Adapter
Edit the Adapter’s configuration file _<Framework-root>kits/MyAdapterBlade/MyAdapterBlade/DataSource/etc/myadapter.conf_
(Once again, you can ignore the "DO NOT EDIT THIS FILE !!!" warning at the top of the file.)
1. Change the title comment to describe the file correctly:
"MyAdapterBlade configuration file".
2. Delete the lines from "## SEED DATA" to the end of the file.
3. Change the `datasrc-id` number from `03` to `04`:
```
#
# DataSource connection configuration
#
datasrc-id ${THIS_LEG}04
...
```
This is the unique connection id for myadapter.
4. Delete the configuration about connecting to a Liberator, as (we’re assuming here) the new Integration Adapter only connects to a Transformer (which in turn connects to a Liberator). The lines to delete are shown below in _italics_:
```
...
#
# DataSource connection configuration
#
datasrc-id ${THIS_LEG}04
#
# Connection to a Liberator
#
add-peer
local-type active|contrib
addr ${LIBERATOR${THIS_LEG}_HOST}
port ${LIBERATOR${THIS_LEG}_DATASRCPORT}
heartbeat-time 15
heartbeat-slack-time 5
end-peer
if "${FAILOVER}" == "ENABLED"
add-peer
local-type active|contrib
addr ${LIBERATOR${OTHER_LEG}_HOST}
port ${LIBERATOR${OTHER_LEG}_DATASRCPORT}
heartbeat-time 15
heartbeat-slack-time 5
end-peer
endif
#
# Connection to a Transformer
#
...
```
That’s all the configuration changes you need for the time being.
## Develop the new C-based Integration Adapter
1. Develop your C-based Integration Adapter following the usual pattern as described in the **C DataSource API Documentation**.
2. Make sure the executable binary file for the Adapter has the correct name; in this example it’s _myadapter_ if the binary runs under Linux, or _myadapter.exe_ if it runs under Windows.
Also, make sure the file has execute permission.
3. You can develop the Adapter within the structure set up for the blade within the Deployment Framework; that is in _<Framework-root>/kits/MyAdapterBlade/MyAdapterBlade..._ Put the Integration Adapter files into the appropriate blade directories within the _MyAdapterBlade_ structure in the Deployment Framework, as follows:
| File Type | Copy to bLADE directory: |
| --- | --- |
| Binary files | _<Framework-root>/kits/MyAdapterBlade/MyAdapterBlade/DataSource/bin/_ |
| Library files | _<Framework-root>/kits/MyAdapterBlade/MyAdapterBlade/DataSource/lib/_ |
| Any other configuration files required; for example, _java.conf_, _jmx.conf_ | _<Framework-root>/kits/MyAdapterBlade/MyAdapterBlade/DataSource/etc/_ |
## Start the new Adapter blade
1. On the server machine that runs your development environment, type this command to allow the Adapter blade to be subsequently started up:
```
./dfw hosts MyAdapterBlade
```
where `hostname` is the hostname of the machine on which the Integration Adapter runs.
**💡 TIP**\
`` can be set to the name `localhost`, but even in development environments, it’s good practice to always set it to the actual hostname of the machine. In production environments you should always use the proper hostnames.
2. If you have exclusive use of the Liberator and Transformer in your development environment, restart the system on your development server machine:
```
./dfw start
```
This stops the deployed core components and Adapter blades and restarts them; in this case the Liberator, Transformer and the new Integration Adapter. (The command works out from the configured hostname settings, which components, including your new Integration Adapter, it needs to start on the machine where the command is running.)
3. Alternatively, if you share the Liberator and/or Transformer with other developers, so you don’t want to shut these components down just to get your new Integration Adapter running:
1. Make sure the Transformer and/or Liberator are running (so as to accept connection requests from the new Integration Adapter):
```
./dfw status
```
followed as required by
```
./dfw start Liberator
```
and/or
```
./dfw start Transformer
```
2. Then start the new blade (and hence its Integration Adapter):
```
./dfw start MyAdapterBlade
```
4. When the Integration Adapter has started:
1. Examine its log files in _<Framework-root>/kits/MyAdapterBlade/MyAdapterBlade/DataSource/var/_ to see if it has connected to the Transformer.and/or Liberator as appropriate.
- 💡 TIP
-
An Integration Adapter can create several types of log file. Generally there will be an event log and a packet log. There may be other DataSource specific logs depending on your Adapter implementation.
The packet log (_packet-MyAdapterBlade.log_) is a binary file; to view it, use the `logcat` utility in _<Framework-root>/kits/Liberator/Latest/bin_
For help about using `logcat`, type `./logcat -h`
2. Look at the Liberator’s status page to check that the Liberator is connected to the Transformer and can see the data service (`FXPriceFeed` in our example) for which the new Adapter supplies data.
3. Use the Liberator’s [Liberator Explorer](../liberator/liberator-liberator-explorer.md) to request data for the relevant subjects supplied by your Adapter, and check that the data is returned (via Transformer) as expected.
5. To stop the blade’s Integration Adapter, run the command:
```
./dfw stop MyAdapterBlade
```
## Package the new Adapter blade
When you’ve developed and tested the new blade to your satisfaction, you’ll need to package it up so it can be deployed on your production system - see How can I... [Package a custom blade](cdf-package-a-custom-blade.md).
---
**See also:**
* [Package a custom blade](cdf-package-a-custom-blade.md)
* [Set up server failover capability](cdf-set-up-server-failover-capability.md)
* [Deploy Platform components to the Framework](cdf-deploy-platform-components-to-the-framework.md)
* [Create a Java-based Adapter blade](cdf-create-a-java-based-adapter-blade.md)
* [Start and stop components and blades](cdf-start-and-stop-components-and-blades.md)