# Trading worked example
A tutorial to guide you through the actual process using the _Trading Library_ to execute trades on a trade tile component.
## Using the Trading API to Perform a Trade on a Trade Tile
Caplin’s _Trading API_ is designed to ease the creation of trades and their execution. The API enables you to communicate with the server, sending and receiving trade messages as required by your interactive trading components, and controlling the trade’s workflow as it evolves in tandem with this communication so as to update your display component to correctly reflect the trade’s state. Additionally, if you are using the _Trading Integration API_ for your backend, your trade model can be used to ensure that this and your GUI maintain a consistent state with each other during the lifetime of the trade.
In the [Presenter Worked Example](../presenter/presenter-worked-example.md) we used Caplin’s _Presenter Library_ to create a very simple trade tile for which we created a fake trade model to simulate trade execution and communication with the server without using the _Trading API_. In this tutorial we’ll be expanding on the tile, creating a simple trade model which fits the tile and using the _Trading API_ to create a trade and to send and receive trade messages.
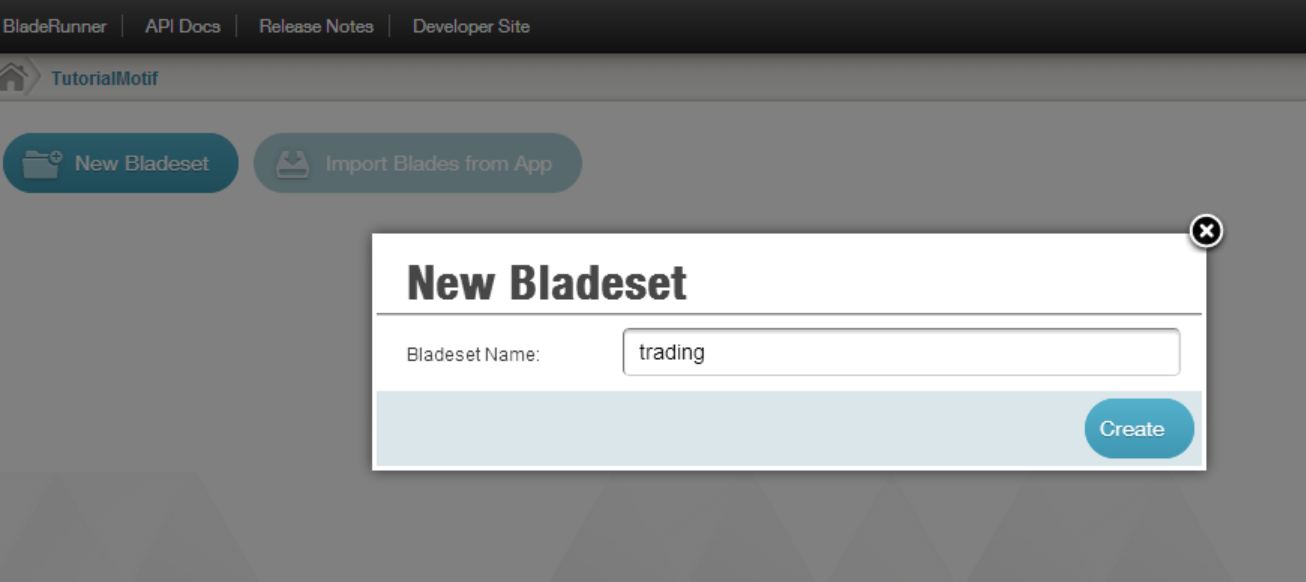
As was the case for the other worked example, we’re using an application called _TutorialMotif_ with namespace `tutorial` and a blade `simpletile`. In the tutorial for the Presenter library we created the simpletile in a bladeset called `presenter`. For this one, let us create a new bladeset called `trading` and copy the simpletile blade to build upon on it in this new bladeset, leaving the Presenter tutorial untouched. Launch the application dashboard for _TutorialMotif_ and create a new bladeset:
Now simply copy the simpletile blade from the blades directory in the _presenter-bladeset_ to that in the _trading-bladeset_. (Remember to change the namespace `tutorial.**presenter**.simpletile` to `tutorial.**trading**.simpletile` throughout, and also the _\src\tutorial\presenter_ folder name in the _src_ and _workbench_.) You can now launch the workbench: http://localhost:7070/TutorialMotif/trading-bladeset/blades/simpletile/workbench/
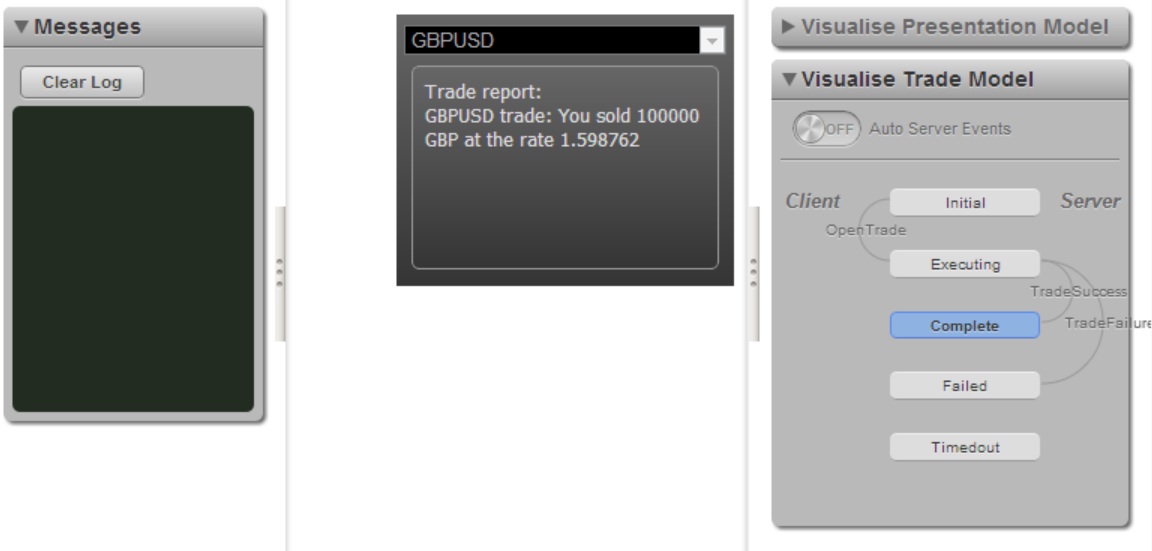
This will be the starting point of our tutorial. As we progress through it we want to be able to achieve a tile which, rather than faking the trade in the background, creates a trade using the _Trading API_, and updates the workflow of the trade as we interact with the tile. We are going to be putting in a _Trade Model Visualizer_ widget into the workbench to help us do this, as seen below.
**❗ IMPORTANT**\
Please note that 'Trade Model Visualizer' widget has now been deprecated. Please use the **'Multi-Trade Visualizer'** widget instead, which will add multi-trade visualization functionality. Refer to this [link,opts="nofollow"](https://docs.caplin.com/developer/api/caplin_trader/4/module-caplin_trading_workbench_TradeStateVisualiser) for the new classes and related documentation.
## Part 1: Creating the Trade Model using XML
A **trade model** represents a type of trade and is used to define and control the life-cycle of a trade. Typical trade models are _Request for Quote_ (_RFQ_) or _Executable Streaming Price_ (_ESP_). But the purpose of this tutorial is to demonstrate how you can define your own trade model to fit to your particular trading system. This is done through a simple XML configuration which will be bundled up, recognised and used by the _Trading API_ when you load your application.
If we try to think of a trade workflow that would suit the simple tile, we can easily settle on a natural workflow in which the trade starts in an "initial" state, progresses to an "executing" state when a buy or sell button is pressed and a trade message is sent to the server, and ends in a "complete" state once we receive a message from the server stating that the trade was successful. Additionally, we can presume that the trade can go into a "failed" state if the server sends back a message stating that the trade was unsuccessful, or if the client waits too long for a reply from the server. A visual representation would be the following simple state transition diagram:
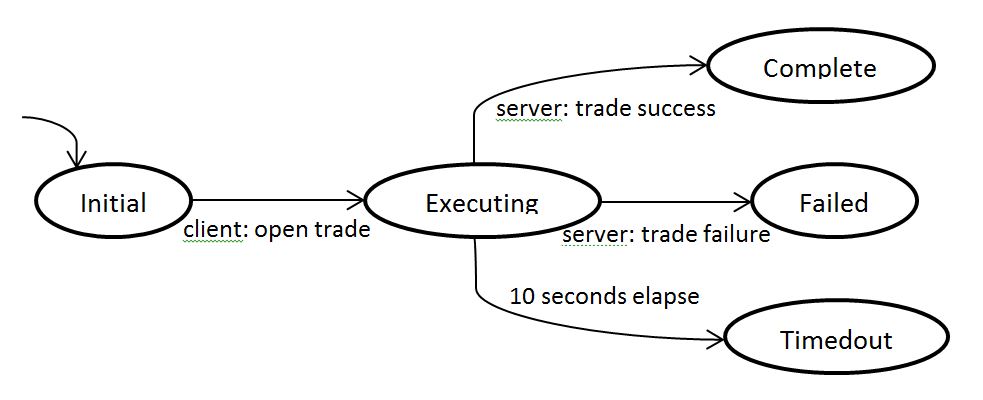
The _Trading API_ supports the configuration of new trade models using XML which reflects this natural workflow representation. The trade model configuration for our tile can be represented as below. Create this trade model in the _resources\xml_ directory of your simpletile blade.
**trading-bladeset\blades\simpletile\resources\xml\SimpleTradeModel.xml**
```xml
```
The `[](https://docs.caplin.com/developer/xml/trading/latest/tradeModel.html)` node defines the initial state which the trade is in by default when it is created. The name given to each trade model needs to be unique in your application as it will determine which trade model is used when the trade is created. Note that each `[](https://docs.caplin.com/developer/xml/trading/latest/transition.html)` between the states must have three attributes. The `trigger` is the name of the trade message which triggers the transition. Therefore a transition between states is triggered when communication happens between the client and the server in which the `trigger` and the `source` of the communication matches a transition in the model from the trade’s current `[](https://docs.caplin.com/developer/xml/trading/latest/state.html)`.
## Part 2: Creating a Trade
Our next step is to create a trade from this trade model. The creation of trades depends on a running **trade service** which in turn, delegates trade creation to a number of registered **trade factories**. A different trade factory implementation is required for each different type of trade (or trade model) as each creates a different type of trade object with its own specific attributes and business logic. An FX trade object, for instance, might manage its trade legs depending on whether it is a _forward_ or _swap_ trade. In our case, the trade factory for the creation of the trade need not be complex and can create a generic trade.
To begin with let us create a new `[TradeFactory,opts="nofollow"](https://docs.caplin.com/developer/api/caplin_trader/4/module-caplin_trading_trademodel_TradeFactory)` which will create trades for our SimpleTrade model:
**trading-bladeset\blades\simpletile\src\tutorial\trading\simpletile\SimpleTradeFactory.js**
```js
tutorial.trading.simpletile.SimpleTradeFactory = function() {
//State machine factory - to retrieve trade model.
var oXmlResourceService = caplin.core.ServiceRegistry.getService ("br.xml-service");
var eTradeModelNode = oXmlResourceService.getXmlDocument("tradeModels")[0];
this.m_oStateMachineFactory = new caplin.trading.statemachine.StateMachineFactory();
this.m_oStateMachineFactory.loadModelsFromXmlElement(eTradeModelNode);
this.m_oStateMachine = this.m_oStateMachineFactory.getStateMachine("SimpleTrade");
//Trade message service - to send and receive trade messages.
this.m_oTradeMessageService = {
addTrade: function(){},
sendTradeEvent: function(){}
};
};
caplin.implement(tutorial.trading.simpletile.SimpleTradeFactory, caplin.trading.trademodel.TradeFactory);
caplin.implement(tutorial.trading.simpletile.SimpleTradeFactory, caplin.trading.trademodel.TradeLegFactory);
tutorial.trading.simpletile.SimpleTradeFactory.prototype.createNewTrade = function(mTradeParameters) {
var sTradingProtocol = mTradeParameters.TradingProtocol;
if(sTradingProtocol == "SimpleTrade") {
var sAssetClass = "FX";
var oTradeLegFactory = this;
var sTradingType = "SPOT";
//Create a trade
var oTrade = new caplin.trading.trademodel.Trade(sAssetClass, oTradeLegFactory, this.m_oStateMachine, this.m_oTradeMessageService, sTradingProtocol, sTradingType, sAssetClass);
for (var sTradeField in mTradeParameters) {
var sFieldValue = mTradeParameters[sTradeField];
oTrade.setFieldValue(sTradeField, sFieldValue);
}
return oTrade;
}
};
tutorial.trading.simpletile.SimpleTradeFactory.prototype.createLeg = function() {
//Not needed for this simple example.
};
tutorial.trading.simpletile.SimpleTradeFactory.prototype.getStateMachine = function() {
return this.m_oStateMachine;
};
```
Let’s go through the implementation of this factory step-by-step:
* The factory needs to have a reference to a `[StateMachineFactory,opts="nofollow"](https://docs.caplin.com/developer/api/caplin_trader/4/module-caplin_trading_statemachine_StateMachineFactory)` which interprets the trade models bundled up in the XML bundle (in our case this will be the "SimpleTrade" state machine) and constructs a trade model implementation from each. These state machines will execute each transition in the trade and maintain the trade’s state.
* The factory also needs a reference to the `[TradeMessageService,opts="nofollow"](https://docs.caplin.com/developer/api/caplin_trader/4/module-caplin_trading_trademodel_TradeMessageService)` which is responsible for sending and receiving trade messages. For now we’ve just created an object with the necessary function stubs. But we’ll speak about this in the next step of the tutorial. (For now we just want to be able to create a new trade.)
* The factory object also implements `[TradeFactory,opts="nofollow"](https://docs.caplin.com/developer/api/caplin_trader/4/module-caplin_trading_trademodel_TradeFactory)` and `[TradeLegFactory,opts="nofollow"](https://docs.caplin.com/developer/api/caplin_trader/4/module-caplin_trading_trademodel_TradeLegFactory)` as it is able to create new trades (`createNewTrade()` function) and create trade legs (`createLeg()` function). The latter is superfluous as we’re creating a very simple trade object, but we need it to create a new trade.
* To create a new trade, the factory first checks that the trade protocol is that expected. Our simple trade is an FX SPOT trade, hence the _asset class_ and _trading type_ set. A new trade needs a reference to the **state machine** which it will use as its workflow. This is derived from the `StateMachineFactory` which returns a state machine for the "SimpleTrade" protocol. We’re also setting the trade parameters (instrument, rate, buy/sell side and amount) as fields on the trade.
Now the trade factory is not invoked directly to create a trade. As I mentioned before, the `[TradeService,opts="nofollow"](https://docs.caplin.com/developer/api/caplin_trader/4/module-caplin_trading_trademodel_CaplinTradeService)` delegates the creation of trades to factories that are registered with it. So next thing we’ll do is create an instance of our trade factory and register it with our trade service. Append the following to the `_registerServices()` function and add a getter function:
**trading-bladeset\blades\simpletile\workbench\src\tutorial\trading\simpletile\workbench\ExampleBladeApplication.js**
```js
this.m_oTradeFactory = new tutorial.trading.simpletile.SimpleTradeFactory();
var oTradeService = caplin.core.ServiceRegistry.getService("caplin.trade-service")
oTradeService.registerTradeFactory({"TradingProtocol": "SimpleTrade"}, this.m_oTradeFactory);
…
tutorial.trading.simpletile.workbench.ExampleBladeApplication.prototype.getTradeFactory = function() {
return this.m_oTradeFactory;
};
```
Notice that when we’re registering the trade factory we’re accompanying this with a mapping. This is instructing the trade service so that all trades that are to be created with the "SimpleTrade" protocol should be delegated to this factory.
Finally let us wire up the tile to create a trade when the "buy" or "sell" button is clicked on the trade tile. We’d previously wired up the buy/sell buttons to invoke the `executeTrade()` function which created a map of trade parameters and created and executed the trade on the `FakeTradeModel`. We now need to append the trade parameters to include the `TradingProtocol` and replace the use of the `FakeTradeModel` with our trade creation service:
**trading-bladeset\blades\simpletile\src\tutorial\trading\simpletile\TilePresentationModel.js**
```js
tutorial.trading.simpletile.TilePresentationModel.prototype.executeTrade = function(sBuySell) {
…
var mTradeParameters = {
…
'TradingProtocol': "SimpleTrade"
};
//var oTrade = new tutorial.trading.simpletile.FakeTradeModel(mTradeParameters, this);
var oTradeService = caplin.core.ServiceRegistry.getService("caplin.trade-service");
var oTrade = oTradeService.createNewTrade(mTradeParameters);
//oTrade.executeTrade();
};
```
Of course we cannot see anything happening when we now click the buy/sell buttons on the tile as we are not yet executing the trade, only creating it in its initial state. Our tile is not yet capable of sending and receiving trade messages to progress between states. For that we are going to need a **trade message service** and we’ll look at this in the next step.
## Part 3: Sending and Receiving Trade Events
Each trade needs to have access to a `[TradeMessageService,opts="nofollow"](https://docs.caplin.com/developer/api/caplin_trader/4/module-caplin_trading_trademodel_TradeMessageService)` which it uses to send and receive trade messages (i.e. to communicate with the trade server). In the previous step we constructed a stub object in the constructor of our `SimpleTradeFactory` and passed this into the `Trade` object.
Now we’ll provide an implementation for this service so that we will be able to relay messages which will cause our trade to transition from one state to another. We’re working in a workbench and we don’t have a real trade server to receive trade events from, so we’ll just implement a mock service which simulates receiving a _trade success_ event from the server as soon as we (the client) send an _open trade_ event. (A real `TradeMessageService` normally implements communication with the trade server, as does the `CaplinTradeMessageService`. The Trading library also contains a `[TradeMessageServiceStub,opts="nofollow"](https://docs.caplin.com/developer/api/caplin_trader/4/module-caplin_trading_testing_TradeMessageServiceStub)` which can be controlled from the `[TradeMessageFixture,opts="nofollow"](https://docs.caplin.com/developer/api/caplin_trader/4/module-caplin_trading_testing_TradeMessageFixture)` when writing acceptance tests for components with trading functionality using [Caplin’s Verifier](../verifier/index.md) framework.)
To begin, create the `MockTradeMessageService` implementation as below. It must implement the `TradeMessageService` interface. Our `MockTradeMessageService` keeps track of only one trade and sets the trading status to "available". Typically you would keep track of several concurrently executing trades in the service implementation, and you would update the trading status to reflect your connection with the server. The function `sendTradeEvent()` will be invoked by the trade object when it wishes to send a client event to the server. Once the server sends back a response event (which we are simulating within here after a 2 second wait) the `TradeMessageService` must invoke `processServerEvent()` to allow the trade to process the response.
**trading-bladeset\blades\simpletile\src\tutorial\trading\simpletile\MockTradeMessageService.js**
```js
tutorial.trading.simpletile.MockTradeMessageService = function() {
this.m_oTrade = null;
};
caplin.implement(tutorial.trading.simpletile.MockTradeMessageService, caplin.trading.trademodel.TradeMessageService);
tutorial.trading.simpletile.MockTradeMessageService.prototype.sendTradeEvent = function(sClientEvent, oTrade, oTradeData) {
if (sClientEvent === "OpenTrade") {
var sServerEvent = "TradeSuccess";
oTradeData.size = function() {return this.length;};
var self = this;
setTimeout(function(){self.receiveServerTradeEvent(sServerEvent, oTradeData)}, 2000);
}
};
tutorial.trading.simpletile.MockTradeMessageService.prototype.receiveServerTradeEvent = function(sServerEvent, oTradeData) {
this.m_oTrade.processServerEvent(sServerEvent, oTradeData);
};
tutorial.trading.simpletile.MockTradeMessageService.prototype.addTrade = function(oTrade) {
this.m_oTrade = oTrade;
oTrade.tradingStatusChanged(caplin.trading.trademodel.TradingStatus.AVAILABLE);
};
tutorial.trading.simpletile.MockTradeMessageService.prototype.removeTrade = function(oTrade) {
this.m_oTrade = null;
};
```
Next, we’ll override the class defined under the trade-message alias with our `MockTradeMessageService`:
**trading-bladeset\blades\simpletile\workbench\src\tutorial\trading\simpletile\workbench\resources\alias.xml**
```xml
```
Then, of course, we also want the SimpleTradeFactory to use this service, instead of the stub implementation which we put in place earlier:
**trading-bladeset\blades\simpletile\src\tutorial\trading\simpletile\SimpleTradeFactory.js**
```js
tutorial.trading.simpletile.SimpleTradeFactory = function() {
…
this.m_oTradeMessageService = caplin.core.ServiceRegistry.getService("caplin.trade-message-service");
};
```
Finally in our trade tile, we want to start the trade’s execution by sending the "OpenTrade" event when the "buy" or "sell" button is clicked. Calling `processClientEvent()` on the `Trade` object will cause this to propagate the client-event to the `TradeMessageService` which it now holds a reference to. (The following replaces the `executeTrade()` method which we previously used with the `FakeTradeModel`.)
**trading-bladeset\blades\simpletile\src\tutorial\trading\simpletile\TilePresentationModel.js**
```js
tutorial.trading.simpletile.TilePresentationModel.prototype.executeTrade = function(sBuySell) {
…
oTrade.processClientEvent("OpenTrade", mTradeParameters);
};
```
Our implementation of the `TradeMessageService` is going to reply back after 2 seconds with a "TradeSuccess" event. Unfortunately we can’t see this happening in the background. However, the trading library (like other libraries in Caplin’s JavaScript API) contains a set of workbench widgets, one of which shows us the trade model and the progress of the trade from one state to the next. The widget is called the `[StateModelVisualiser,opts="nofollow"](https://docs.caplin.com/developer/api/caplin_trader/4/module-caplin_trading_workbench_ui_StateModelVisualiser)`(**Note**: this class is now deprecated, please use the ``[TradeStateVisualiser,opts="nofollow"](https://docs.caplin.com/developer/api/caplin_trader/4/module-caplin_trading_workbench_TradeStateVisualiser)``instead) and it needs a reference to the trade model (from the state machine) and the trade message service, to detect when transitions happen between the states. To insert this widget in the workbench add the following code to the workbench application entry point:
**trading-bladeset\blades\simpletile\workbench\index.html**
```js
var initialise = function() {
…
var oTradeFactory = oApplication.getTradeFactory();
var workbench = createWorkbench(oPresentationModel, oTradeFactory);
…
};
var createWorkbench = function(oPresentationModel, oTradeFactory) {
…
workbench.addToRightWing(createTradeModelView(oTradeFactory.getStateMachine()), "Visualise Trade Model");
return workbench;
};
…
var createTradeModelView = function(oStateMachine) {
var oStateMonitor = new caplin.trading.workbench.model.StateMachineMonitor(oStateMachine.getStateModel());
oStateMonitor.setStateMachine(oStateMachine);
oStateMonitor.setStateOrder(["Executing", "Complete", "Failed", "Timedout"]);
var oTradeMessageService = caplin.core.ServiceRegistry.getService("caplin.trade-message-service");
var oStateViewer = new caplin.trading.workbench.ui.StateModelVisualiser(oStateMonitor, oTradeMessageService);
return oStateViewer;
};
```
This will enable us to see the progress of the trade. (And if we didn’t automate the server response in the mock, we could use it to simulate server events too!). When you launch the workbench you should see the visualiser on the right hand side of the window, and when you click on the tile to perform a trade you should notice the state machine progressing from one state to the next:
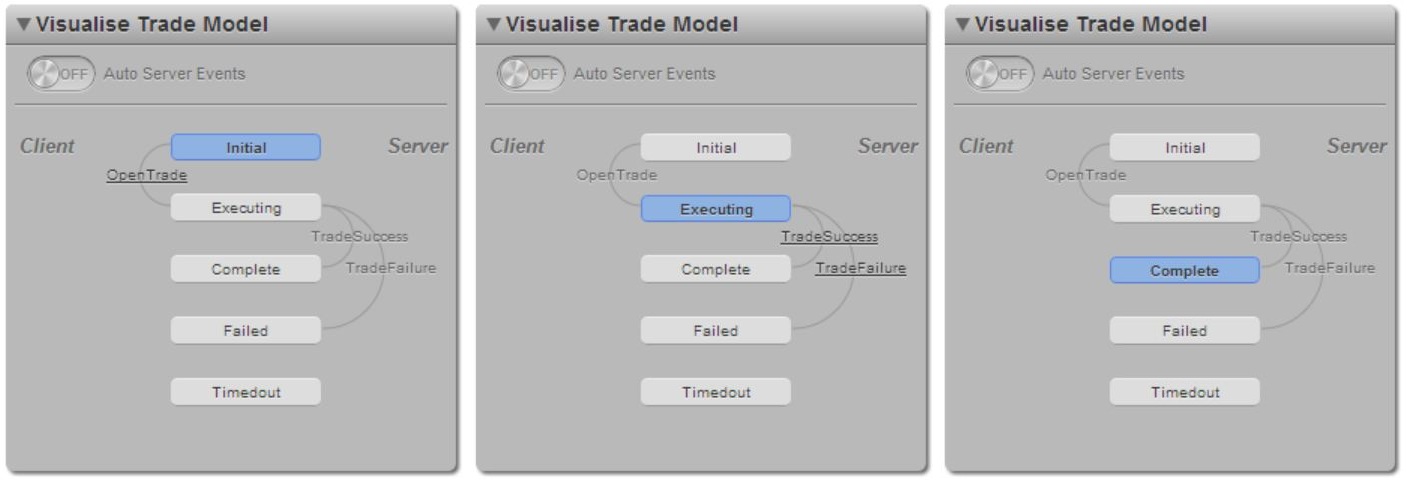
All of this is all very well, but we still cannot see anything going on in our tile component. In the next step we’ll set the tile component to listen to state changes on the trade object so that we can update our GUI accordingly.
## Part 4: Listening to Trade State Changes
When our tile creates a trade object, besides triggering client-sourced trade events it needs to be notified of the changes in the trade workflow when the server returns an event. To do this we need to set the tile to listen to the trade’s state changes immediately after creating the trade and before sending the first client event:
**trading-bladeset\blades\simpletile\src\tutorial\trading\simpletile\TilePresentationModel.js**
```js
tutorial.trading.simpletile.TilePresentationModel.prototype.executeTrade = function(sBuySell) {
…
var oTrade = oTradeService.createNewTrade(mTradeParameters);
oTrade.addStateChangedListener(this);
oTrade.processClientEvent("OpenTrade", mTradeParameters);
};
```
We are setting the `TilePresentationModel` as a listener for state changes. This object must implement the `[StateChangedListener,opts="nofollow"](https://docs.caplin.com/developer/api/caplin_trader/4/module-caplin_trading_statemachine_StateChangedListener)` interface and the `stateChanged()` method:
**trading-bladeset\blades\simpletile\src\tutorial\trading\simpletile\TilePresentationModel.js**
```js
caplin.implement(tutorial.trading.simpletile.TilePresentationModel, caplin.trading.statemachine.StateChangedListener);
tutorial.trading.simpletile.TilePresentationModel.prototype.stateChanged = function(oState, sEventName, oTradeData) {
//Update GUI to reflect state change
};
```
The `stateChanged()` method will be called by the trade’s `[StateMachine,opts="nofollow"](https://docs.caplin.com/developer/api/caplin_trader/4/module-caplin_trading_statemachine_StateMachine)` when a transition occurs and the state changes. Since we are sending the "OpenTrade" event the first transition made will be that to the "Executing" state. In the Presenter tutorial we implemented the `onTradeCompleted()` function, which replaced the tile display with a final trade confirmation message. To achieve the same goal when the trade reaches a final state, we can call this function from the `stateChanged()` function. Implement the following logic to complete the tile’s functionality:
**trading-bladeset\blades\simpletile\src\tutorial\trading\simpletile\TilePresentationModel.js**
```js
tutorial.trading.simpletile.TilePresentationModel.prototype.stateChanged = function(oState, sEventName, oTradeData) {
if (oState.isFinalState()) //Exclude that state is "Executing"
{
var sState = oState.getName();
var sMessage = "Trade report:\n";
if (sState === "Complete") {
var buySellMessage = oTradeData.get("side") == 'BUY' ? 'bought ' : 'sold ';
var amount = oTradeData.get("amount");
var instrument = oTradeData.get("instrument");
var dealtCurrency = oTradeData.get("dealtCurrency");
var rate = oTradeData.get("rate");
sMessage += instrument + " trade: You " + buySellMessage + amount + " " + dealtCurrency
+ " at the rate " + rate;
}
else if (sState === "Failed") {
sMessage += "The attempted trade failed.";
}
else if (sState === "Timedout") {
sMessage += "The attempted trade timed out.";
}
this.onTradeCompleted(sMessage);
}
};
```
When you now press the "buy" or "sell" button to the trade ticket:
* The tile will create a new trade object with a "SimpleTrade" trading protocol. (The trade service will delegate trade creation to the `SimpleTradeFactory` which will return an instance of the trade.) The trade will by default be in the "Initial" state.
* The tile will set itself as a listener of state changes on the newly created trade.
* You will send an "OpenTrade" event which will be processed by the trade setting it into the "Executing" state. This will notify the tile via the `stateChanged()` function.
* The `MockTradeMessageService` will receive this event and immediately reply to the trade with a "TradeSuccess" event which will set the state to "Complete" and notify the tile.
* The tile will access the data on the trade object to display a message within the tile.
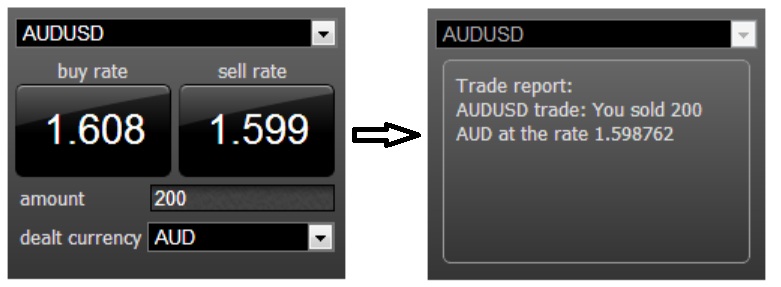
Of course there are several other transitions which we can cause via the `MockTradeMessageService`. Change its reaction to the "OpenTrade" event to trigger a "TradeFailure" response by changing the server event’s name:
**trading-bladeset\blades\simpletile\src\tutorial\trading\simpletile\TilePresentationModel.js**
```js
tutorial.trading.simpletile.MockTradeMessageService.prototype.sendTradeEvent = function(sClientEvent, oTrade, oTradeData) {
…
var sServerEvent = "TradeFailure";
…
};
```
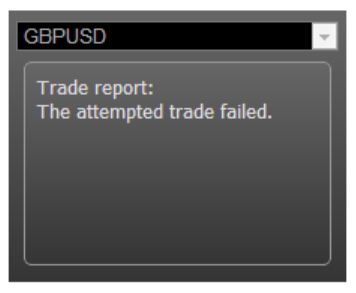
If a message is triggered by the server or the client which does not follow the trade protocol prescribed by our `SimpleTradeModel`, the _Trading library_ will cause an error message to appear in your console window. Try the following to send an "OpenTrade" event when the trade is already in the "Executing" state. You should see an error message in the console window of your browser stating that "OpenTrade is not a defined Event on the current state (Executing)".
**trading-bladeset\blades\simpletile\src\tutorial\trading\simpletile\TilePresentationModel.js**
```js
tutorial.trading.simpletile.MockTradeMessageService.prototype.sendTradeEvent = function(sClientEvent, oTrade, oTradeData) {
…
var sServerEvent = "OpenTrade";
…
};
```
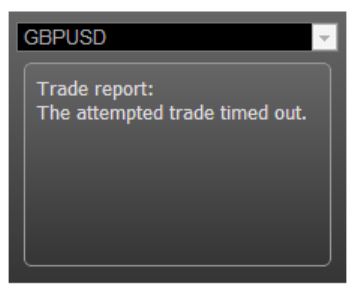
Finally, if no transition happens within 10 seconds of entering the "Executing" state, the trade should time out and transition to the "Timedout" state. You can simulate this by not replying to the "OpenTrade" event. Once you click on the buy/sell button in the tile, the timeout message should appear after 10 seconds:
**trading-bladeset\blades\simpletile\src\tutorial\trading\simpletile\TilePresentationModel.js**
```js
tutorial.trading.simpletile.MockTradeMessageService.prototype.sendTradeEvent = function(sClientEvent, oTrade, oTradeData) {
//Do nothing and wait for the trade to time out
};
```