# Verifier worked example
A tutorial to guide you through the actual process of using _Verifier_ to test a trade tile component.
## Using Verifier to Write Acceptance Tests for a Simple Trade Tile
The _Verifier framework_ simplifies the creation and execution of tests for complex components such as trade tiles. In the [Presenter Worked Example](../presenter/presenter-worked-example.md) we created a simple trade tile using the [Presenter](../presenter/index.md) library. Any _Presenter_ component, such as the tile, is composed of a presentation model which consists of fields and properties and an HTML view the elements of which are bound to the properties in the presentation model.
In this tutorial we’re going to create an acceptance test for that trade tile, to check that the _view-model bindings_ between the _Presenter_ component model, and the template it is using are correct. If you have not worked through it yet, you may want to familiarise yourself with what we did in the [Presenter worked example](../presenter/presenter-worked-example.md) before you embark on this one.
These tests could then be integrated with a Continuous Integration build environment (Jenkins, Go, or similar), to provide automated regression testing as part of the build process for a project.
As was the case for the other worked example, we’re using an application called _TutorialMotif_ with the namespace `tutorial` and a blade called `simpletile`. In the tutorial for _Presenter_ we created the tile in a bladeset called `presenter`. the purposes of this example we will make a separate bladeset, although in practice tests will live inside the working blades. So, first launch the BladeRunnerJS dashboard for TutorialMotif and create a new bladeset called `verifier` so that you can build on it while leaving the Presenter tutorial untouched.
Then simply copy the _simpletile blade_ from the _blades_ directory in the _presenter-bladeset_ to the matching directory in the _verifier-bladeset_.
**📌 NOTE**\
Remember to change the namespace `tutorial.**presenter**.simpletile` to `tutorial.**verifier**.simpletile` throughout, and also the _src\tutorial\presenter_ folder name in the _src_ and _workbench_.
## Part 1: Set-up the test infrastructure
The directory structure for our blade should be similar to that shown below. Create the acceptance test directory structure (starting with _test-acceptance_) as indicated. The _bundles_ directory will be populated with the bundles generated when the tests are run. We’ll create our acceptance test at the lowest level of the _tests_ directory.
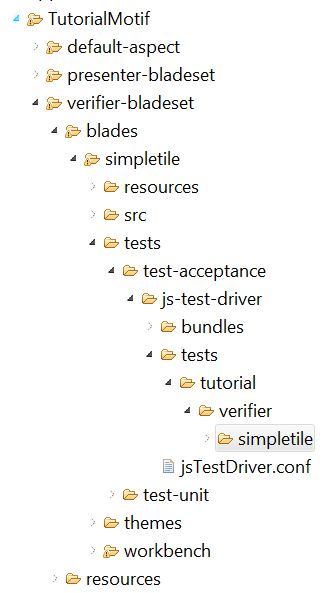
Next you’ll create and populate the **_jsTestDriver.conf_** file in the _js-test-driver_ directory as follows:
**verifier-bladeset\blades\simpletile\tests\test-acceptance\js-test-driver\jsTestDriver.conf**
```yaml
server: http://localhost:4224
basepath: .
plugin:
- name: "BundleInjector"
jar: ../../../../../../../../sdk/libs/java/testRunner/js-test-driver-bundler-plugin.jar
module: com.caplin.jstestdriver.plugin.CutlassBundleInjectorPlugin
load:
- bundles/js/js.bundle
- bundles/i18n/en_i18n.bundle
serve:
- bundles/html.bundle
- bundles/xml.bundle
test:
- tests/**.js
```
This configuration file is very sensitive when it comes to spacing, for this file to be parsed correctly ensure each line that begins with a dash is preceded by two spaces only (no tabbing).
## Part 2: Writing the acceptance test
We’re going to write an acceptance test which opens the tile and sets the [_buy and sell property values_](../presenter/presenter-worked-example.md#pres-we-5) on the tile’s presentation model. What we expect when this is done, is that the tile’s _view_ (HTML representation) will reflect these values, rounded to three decimal places, and that they will show up in the right places. Create a test file called **_SimpleTileTest.js_** and populate it with the following code:
**verifier-bladeset\blades\simpletile\tests\test-acceptance\tests\tutorial\verifier\simpletile\SimpleTileTest.js**
```js
caplin.testing.GwtTestRunner.initialize();
caplin.include("caplin.presenter.component.PresenterComponentFactory");
describe("Simple Tile binds correctly", function(){
fixtures("tutorial.verifier.simpletile.testing.SimpleTileTradeFixtureFactory");
it("correctly binds and rounds the buyRate", function(){
given("tile.viewOpened = true");
and("tile.model.setupNode.buyRate = 1.1234567");
then("tile.view.(div button:first).text = '1.123'");
});
it("correctly binds and rounds the sellRate", function(){
given("tile.viewOpened = true");
and("tile.model.setupNode.sellRate = 0.987654");
then("tile.view.(div button:eq(1)).text = '0.988'");
});
});
```
Because the syntax is quite user-friendly and "human readable", it’s fairly easy to convey the objective of each test. Before the test will run however, there are some things that need to be done:
* Initialize the _GwtTestRunner_, to start the _Given-When-Then_ adapted version of _Jasmine_ that _Verifier_ uses to run tests. The first line of the above code handles this.
* Include the `[PresenterComponentFactory,opts="nofollow"](https://docs.caplin.com/developer/api/caplin_trader/4/module-caplin_presenter_PresenterComponentFactory)` so that a Presenter based component can be used in the test. This is handled by the `caplin.include` line in the code.
* Include the component’s `[FixtureFactory,opts="nofollow"](https://docs.caplin.com/developer/api/caplin_trader/4/module-br_test_FixtureFactory)` which will create instances of the _fixtures_ that the test will require to be able to run. This is included within the `fixtures()` class, as shown above, but there is a bit more to it than that...
The `SimpleTileTradeFixtureFactory` is what associates the `tile.` property reference to the tile component via a _fixture_. You’ll create it in the next step of the tutorial, before you run the test.
The first line of each test will begin with a _given,_ which, unless it continues from another test, will use a fixture to create the _Presenter component_ and its _view_. The second clause, _when,_ then accesses the model of the component and sets the _buy/sellRate_ property value. In this case, the _then_ clause accesses the view to check the resulting value. It uses a jQuery selector to locate the DOM element where the set values should appear.
**📌 NOTE**\
Although the example above makes use of `eq(1)` to locate a button, it is advisable to use class names and IDs where possible to make sure the tests are resistant to changes in the html.
## Part 3: Setting the alias scenario
The code we are testing makes use of [services](../bladerunnerjs/bladerunnerjs-available-services.md), but we will not want our test to use the real implementations of those services. To use stub implementations of these services, we simply have to change the alias scenario to "dev". This can be done by adding an aliases.xml file to the _js-test-driver\resources_ directory as follows:
**verifier-bladeset\blades\simpletile\tests\test-acceptance\js-test-driver\resources\aliases.xml**
```xml
```
## Part 4: Creating the FixtureFactory
The `SimpleTileTradeFixtureFactory` needs to create any fixtures which will be required by the test. These may be generic fixtures, or possibly a bespoke fixture will be required. The tests we’re performing are _view-model binding tests_, so the generic fixtures should be sufficient. In particular we need to register the `[PresenterComponentFixture,opts="nofollow"](https://docs.caplin.com/developer/api/caplin_trader/4/module-br_presenter_testing_PresenterComponentFixture)` that will be used, passing it the appropriate view template and presentation model that the tile uses. The fixture factory’s contents should be as below.
**verifier-bladeset\blades\simpletile\src\tutorial\verifier\simpletile\testing\SimpleTileTradeFixtureFactory.js**
```js
/**
* Constructs the SimpleTileTradeFixtureFactory required to run tile tests.
*/
tutorial.verifier.simpletile.testing.SimpleTileTradeFixtureFactory = function() {
//Set date format as to match that expected by the tests
caplin.i18n.Translator.getTranslator().getDateFormat = function() { return "DD MMM YYYY";};
};
caplin.implement(tutorial.verifier.simpletile.testing.SimpleTileTradeFixtureFactory, caplin.testing.FixtureFactory);
/**
* This method is called by the test-runner before each Jasmine tests.
*/
tutorial.verifier.simpletile.testing.SimpleTileTradeFixtureFactory.prototype.setUp = function()
{
var oConnectionServiceStub = caplin.core.ServiceRegistry.getService("caplin.connection-service");
this.m_oConnectionServiceFixture.setConnectionServiceStub(oConnectionServiceStub);
};
/**
* This method is called once by the test-runner after the SimpleTileTradeFixtureFactory is constructed and adds
* to the test runner all the fixtures that are needed by the tests, assigning to each a corresponding node expression.
* The fixtures required by the tests are for the tile presenter component (tile.model., tile.view.)
*/
tutorial.verifier.simpletile.testing.SimpleTileTradeFixtureFactory.prototype.addFixtures = function(oTestRunner) {
var fOnOpenCallback = function(oComponent) {};
this.m_oComponentFixture = new caplin.presenter.testing.PresenterComponentFixture("tutorial.verifier.simpletile.simpletile-template", "tutorial.verifier.simpletile.TilePresentationModel");
this.m_oComponentFixture.onOpen(fOnOpenCallback);
oTestRunner.addFixture("tile", this.m_oComponentFixture); //tile.*
// - Connection Service Fixture -
this.m_oConnectionServiceFixture = new caplin.services.testing.ConnectionServiceFixture();
oTestRunner.addFixture("connection", this.m_oConnectionServiceFixture); // connection.*
};
```
## Part 5: Running the tests
Before running the tests, we will need a browser to serve them. First ensure that _test-runner.conf_, found in _BladeRunnerJS’s conf_ directory, has at least one reference to a browser. For example, under `browserPaths:` we should see something like chrome: `C:\Program Files\Google\Chrome\Application\chrome.exe`
For the purposes of this example, to view how the results look when we have failing tests, remove the _DecimalFormatter.js_ file along with the references to the formatter in _SetupPresentationNode.js_ (instructions on adding this back in will follow).
You should now be ready to run the tests, by starting the server and running the appropriate test as described in the [Verifier overview](verifier-architectural-overview.md).
* In a command prompt window, navigate to the _BladeRunnerJS sdk directory._
* Type `brjs test-server`. If successful this will open a browser window and say `Server: Waiting`.
* In a separate command prompt window, navigate also to the _sdk_ directory.
* Type `brjs test ..\apps\TutorialMotif\verifier-bladeset\blades\simpletile ATs` (i.e. `brjs test `). Be careful not to point at a directory too low in the hierarchy as Verifier is expecting to find a _jsTestDriver.conf_ file and a _tests_ directory below the _\simpletile\tests\test-acceptance\js-test-driver_ directory.
## Part 6: Temporarily removing tests / test suites from the test run
While modifying or adding individual tests it is sometimes convenient to temporarily remove tests that don’t concern us so we can repeatedly run our tests as quickly as possible. To remove an entire suite of tests from the test-run, we simply replace `describe` with `xdescribe`. Likewise, to stop an individual test from running within a suite of tests, we replace `it` with `xit`:
```js
describe("Simple Tile binds correctly", function(){
fixtures("tutorial.verifier.simpletile.testing.SimpleTileTradeFixtureFactory");
xit("correctly binds and rounds the buyRate", function(){
given("tile.viewOpened = true");
and("tile.model.setupNode.buyRate = 1.1234567");
then("tile.view.(div button:first).text = '1.123'");
});
it("correctly binds the buy button", function(){
given("test.continuesFrom = 'correctly binds and rounds the buyRate'");
⋮
});
});
```
Using this method will enable us to run a smaller sample of tests, while still being able to continue from the tests that we have temporarily removed. For example, in the test above, the first test is not run, however we can still run the following test which continues from it. Another benefit of using this approach is that it makes it much easier to find removed tests in the code, the test results will also reference the tests that are not running.
## Part 7: Possible pitfalls
While you are creating your tests, watch out for the following common pitfalls and omissions:-
### Browser configuration
You may receive an error while running the `brjs test` or `test-server` commands, if you do not have at least the _Chrome_ browser correctly configured in your _test-runner.conf_ file. Find this configuration file in your _{bladerunnerjs_root}/conf_ directory, and ensure that the path to the browser’s exe file is correct for your machine in the `browserPaths:` section of this file.
### Incorrect test infrastructure
You may receive an error if the XML bundler is not included, or you do not have the appropriate initialisation code in your _jsTestDriver.conf_ file. For example if you only have...
```yaml
serve:
- bundles/html.bundle
```
then add the following line to your _jsTestDriver.conf_ file:
```yaml
- bundles/xml.bundle
```
This will then automatically bundle all XML in your application, and make it available within your code.
In addition, you need to ensure that each test file includes the first line:
```javascript
caplin.testing.GwtTestRunner.initialize();
```
## Part 8: Test results
If you’ve already applied a formatter to the `buyRate` and `sellRate` in the `SetupPresentationModel`, then the tests should pass and you will see the following result output:
```
C:\BladeRunnerJS\sdk>brjs test ..\apps\TutorialMotif\verifier-bladeset\blades\simpletile ATs
BladeRunnerJS SDK version: 3.0.0-241935, built on: 17 October 2012 16:53 BST Server already running, not bothering to start a new instance...
Testing tests (ATs):
Chrome: Reset
Chrome: Reset
..
Total 2 tests (Passed: 2; Fails: 0; Errors: 0) (41.00 ms)
Chrome 22.0.1229.94 Windows: Run 2 tests (Passed: 2; Fails: 0; Errors 0) (41.0
0 ms)
19-Oct-2012 11:03:23 com.google.jstestdriver.ActionRunner runActions
INFO:
Tests Passed.
- Time Taken: 5secs
```
If you have not applied a formatter, the tests will fail. In order to implement the expected behaviour and get the tests to pass, you’ll need to create a formatter to round the values to three decimal places and apply it to the `buyRate` and `sellRate` properties.
Create the formatter:
**verifier-bladeset\blades\simpletile\src\tutorial\verifier\simpletile\formatter\DecimalFormatter.js**
```js
/**
* Formatter that formats the value to the specified number of decimal places.
*/
tutorial.verifier.simpletile.formatter.DecimalFormatter = function() {
};
caplin.implement(tutorial.verifier.simpletile.formatter.DecimalFormatter, caplin.core.Formatter);
/**
* Format the value to the specified number of decimal places.
*/
tutorial.verifier.simpletile.formatter.DecimalFormatter.prototype.format = function(vValue, mAttributes) {
return caplin.core.Number.isNumber(vValue) ? caplin.core.Number.toFixed(vValue, mAttributes["dp"]) : vValue;
};
tutorial.verifier.simpletile.formatter.DecimalFormatter.prototype.toString = function() {
return "tutorial.verifier.simpletile.formatter.DecimalFormatter";
};
tutorial.verifier.simpletile.formatter.DecimalFormatter = new tutorial.verifier.simpletile.formatter.DecimalFormatter();
```
Next, apply the formatters to the properties:
**verifier-bladeset\blades\simpletile\src\tutorial\verifier\simpletile\SetupPresentationNode.js**
```js
tutorial.verifier.simpletile.SetupPresentationNode = function(oParentPresentationNode) {
⋮
this.buyRate.addFormatter(tutorial.verifier.simpletile.formatter.DecimalFormatter, {dp:3});
this.sellRate.addFormatter(tutorial.verifier.simpletile.formatter.DecimalFormatter, {dp:3});
⋮
};
```
When you now run the tests, they should discover the expected values and pass.