Developing with FX Professional
You have the option of taking a source code release of FX Professional, which allows you to customise and extend FX Professional. This page provides an overview of how to get started.
We encourage extending Caplin source code rather than changing it. Changing core Caplin source code can make taking future upgrades more difficult.
Caplin offers training on FX Professional and can offer advice on how to customise it safely. To learn more, contact your Caplin account manager.
Requirements
Source code:
-
The source zip for FX Professional, available from the Caplin downloads page.
Network access:
-
Network access to GitHub
-
Network access to the npm registry
Build dependencies:
| FX Professional | Node.js | Pnpm | Yarn | OpenJDK |
|---|---|---|---|---|
6.0+ |
20 |
10.28.0 |
- |
11, 17 |
5.5–5.17 |
20 |
8 |
- |
11, 17 |
5.3–5.4 |
20 |
8 |
- |
11 |
5.0–5.2 |
18 |
8 |
- |
11 |
4.3 |
18 |
8 |
- |
11 |
4.0–4.2 |
16 |
8 |
- |
11 |
3.0–3.40 |
14 |
- |
14 |
11 |
A working Caplin Platform stack, connected to your backend systems, composed of:
-
Liberator, with the following blades activated:
-
Auth module: TokenAuth (required for User Config permissioning) or Caplin Permissioning Service
-
BlotterExport
-
-
Transformer, with the following modules:
-
Charting Service (if your FX Professional variant includes charting).
-
Watchlist Service (if your FX Professional includes watchlists).
-
Alerts Service (if your FX Professional includes notifications).
-
FieldMapper module (if your FX Professional includes post-trade allocations).
-
Any other modules specific to your deployment, as advised by Caplin.
-
Integration adapters specific to your deployment, as advised by Caplin.
Preparing for development
There are a couple of things you need to decide on for this project:
-
Where to store the project’s Java dependencies.
-
A Git branching strategy that makes taking future source code releases easier.
Storing dependencies
Before you start customising FX Professional, decide where you’re going to store this project’s Java module dependencies, as listed in the file fxpro/apps/fxtrader/server/java/dependencies.gradle.
The FX Professional source zip includes Java dependencies required by the local development server. You have two options:
-
(Recommended) Import the Java dependencies into a Maven compatible repository, such as Artifactory.
-
Continue to store the Java dependencies with your project and commit them to Git
Branching strategy
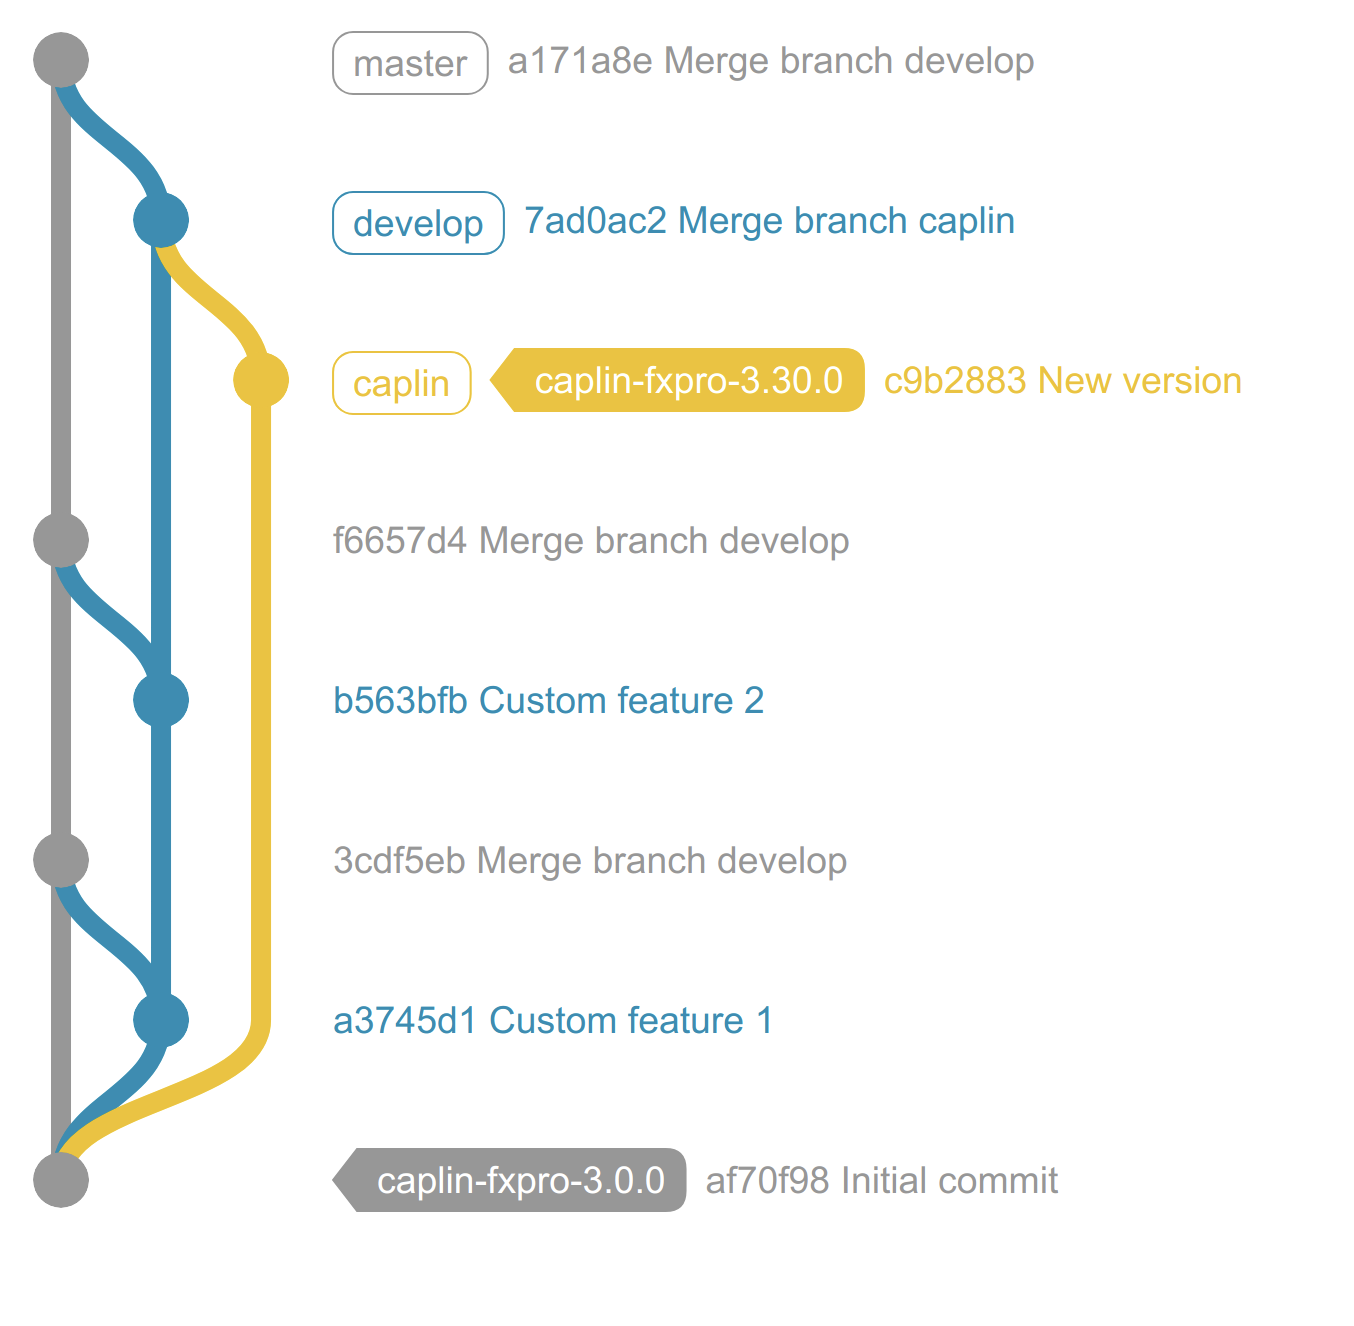
It’s important to decide on a branching strategy early on in the project to make taking upgrades to FX Professional easier. An example of a simple branching strategy follows, which uses a caplin branch to track changes between Caplin source code releases and merge them into an integration branch, develop.
To set up this example branching strategy, follow the steps below:
-
Create a new directory to host your project.
-
Extract the FX Professional source ZIP to the project directory.
-
Initialize the git repository:
$ git init -
Add all files to the staging area:
$ git add --all -
Execute the initial commit:
$ git commit -m "Initial commit" -
Tag the commit to record the version of the Caplin source code release:
$ git tag caplin-fxpro-3.0.0 -
Create an integration branch (
develop) and a branch to track Caplin source code releases (caplin):$ git branch develop $ git branch caplin
When a new version of FX Professional is released:
-
Checkout the
caplinbranch:$ git checkout caplin -
Delete all files in the
caplinbranch:$ rm -r *Do not use git rm -r *to delete the files. Note that if you delete the files using an IDE, it’s probable thegit rmcommand is used to execute the deletion. -
Extract the new source code release to the
caplinbranch. -
Update Git’s staging area to match your working directory:
$ git add --all -
Commit changes:
$ git commit -m "Caplin source code release FX Professional 3.30.0" -
Tag the commit:
$ git tag caplin-fxpro-3.30.0 -
Checkout the
developbranch:$ git checkout develop -
Merge
caplinintodevelop:$ git merge caplin -
Resolve merge conflicts.
Creating your development project
Follow the steps below:
-
Extract the FX Professional source zip to a new project directory (
my-projectin this example): -
If you have chosen to store your Java module dependencies in a Maven compatible repository, follow the steps below:
-
Import all the JAR files from the
libdirectory below into your repository. For the correct Maven group ID to use for each JAR file, refer to the filedependencies.gradle. -
Add your Maven repository to the
repositoriesblock of thebuild.gradlefile below:repositories { mavenCentral() maven { url "https://plugins.gradle.org/m2/" } maven { url '<your_maven_repository>' } }
-
-
Initialize the project root as a Git repository:
$ git init
-
Create Git branches according to your branching strategy. See Branching strategy, above.
-
In the directory
apps/fxtrader/run the command below to install this project’s Node modules:FX Professional 4$ pnpm install
FX Professional 3$ yarn install
You can now start customising the source code of FX Professional.
Previewing your changes
To run the local development server, run the appropriate command below from apps/fxtrader:
-
If you store your project’s Java dependencies in a Maven compatible repository, run the appropriate command below:
FX Professional 4$ pnpm start --variant variant
FX Professional 3$ yarn start --variant variant
This method deletes all local Java dependencies in the apps/fxtrader/server/java/src/main/webapp-common/WEB-INF/libdirectory. -
If you store your project’s Java dependencies with your project’s source code, run the appropriate command below:
FX Professional 4$ pnpm start --variant variant --useLocalDeps
FX Professional 3$ yarn start --variant variant --useLocalDeps
If you accidentally omit the --useLocalDepsargument, the local Java dependencies in theapps/fxtrader/server/java/src/main/webapp/WEB-INF/libdirectory are deleted. To use--useLocalDepsagain, you must manually restore the Java dependencies from the FX Professional source zip file.
View a preview of your customisations at http://localhost:8080.
When you make a change to your project, refresh the page to view your changes.